 Regularly I get this question from my customers:
I would like to enforce an approval process inside my development lifecycle. How can I do that in Rational Team Concert?
The setup seems complex because it requires changes at different levels in RTC:
- In the Work Item workflow,
- In the Work Item preconditions,
- In the Work Item permissions.,
This post describes all the steps (and even more) to set up such approval mechanism in RTC.
For my example, I will use the JUnit sample provided with RTC.
Setup approvals in RTC
Add an Approved state to the workflow
Let say, we want to enforce the approval of Scrum tasks in the JUnit Project, i.e. once a task is Done, if an approval is requested, then RTC should enforce this approval.
Let check first the Workflow attached to the Task:
To enforce the approval, we add a new state “Approved” expressing this enforcement. The associated state diagram looks like this:
The workflow in the Project Area editor should look like this after these changes:
To express the fact that a Done task cannot be considered as closed, we also change the group of the “Done” state from “Closed” to “In Progress” and set the group of the “Approved” state to “Closed.”
 Enforce approvals in the process
At this point we can complete the Save Work Item behavior by adding a precondition which will check if all the approvals are approved when the user is trying to change the state to Approved. To achieve that, apply the following steps:
- In the Process Configuration, go to the Team Configuration > Operation Behavior page

- In the Operation Behavior section, retrieve the operation Save Work Item (server) then select the cell which is in column of the desired role

- In the Precondition section, add the precondition named Required Approvals
- In the operation description part
- Check the box “Enforce only for existing approvals,” like that only Tasks which have an approval set will be checked.
- Expand the Task work item type
- Select the “Approved” state and press the “Edit” button
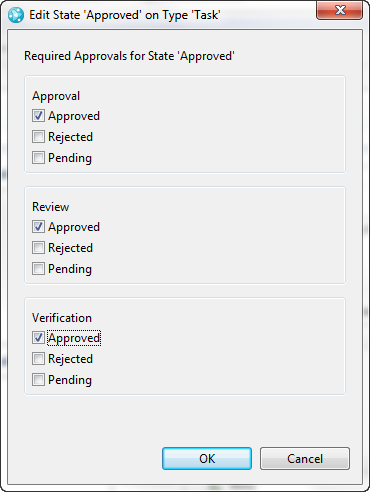
- Indicate that you want to enforce any kind review: Approvals, Reviews or Verification and press OK.

The current operation configuration should look like this:
Test approval
At this point you can already test how your process behaves.
- Let’s assign a new Task to Bill and request as the approver the creator of the task.

- Bill can mark his task as completed (Done state) but if he tries to approve it, he will get the following Team Advisor message:

- In parallel, the creator can follow his pending approvals:
Control who can modify approvals
I know some suspicious customers who want to be sure that their developers will not be able to delete or modify the approval to bypass the approval process. This restriction can be easily defined using RTC permissions:
- In the Process Configuration, go to the Team Configuration > Permissions page
- Select the radio button “Show all actions and roles” to have an overview of the permissions
- Unmark In the permissions Work Items > Save Work Items (server) > Modify Work Item > Setting up work item approvals for all roles but the Scrum Masters.

Test Approval access
Now, if somebody else then a Scrum master will try to add, modify or delete an approval, he will get the following Team Advisor message:
Lock the Work Item when approved
Once the work item has been approved we might want to not let anybody change any single field in it. Actually, and approval is an agreement on the status of some data so, obviously, you don’t want to let anybody else to change these data once you gave your approval.
To implement such behavior, we have a Save Work Item precondition named “Prevent editing”.
- In the Process Configuration, go to the Team Configuration > Operation Behavior page
- In the Operation Behavior section, retrieve the operation Save Work Item (server) then select the cell which is in column of the desired role
- In the Precondition section, add the precondition named Prevent Editing

- In the operation description part
Test prevent editing feature
At this point, depending on the selected role in the step 2 of the previous section, either nobody, or at least, the concerned people will not be able to change any field of a work items once it has been approved.
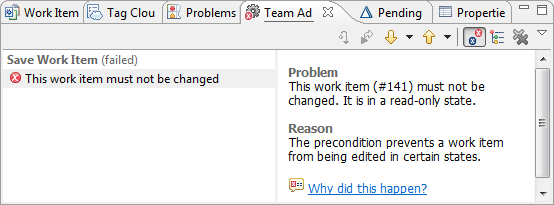
So if you try to change and save any field in a work item which is in an Approved state, you will get the following Team Advisor warning:
Approval with e-signature
I left this last case for the end because I’m not fully satisfied with the final result. Nevertheless, before any complain, let understand the purpose of such approval.
Some very conservative customers require not only the default approval mechanism we already put in place but they also require that the user who is currently approving the Work Item, identifies himself to be sure that nobody else is currently using the current account to approve the current work item…
In RTC, this digital signature, named e-signature, will consist in requesting to the current approver to provide his password again.
The configuration of this approval requires 3 main steps:
- Create the attribute which will store the e-signature,
- Edit the work item presentation to display this new field in a specific place, and
- Add the precondition which will enforce the e-signature.
Create a custom attribute for the e-signature
First, add a custom attribute to store the e-signature to the Tasks
- Open the Project Configuration > Configuration Data > Work Items > Types and Attributes page
- Select the Work Item type Task
- Add an e-Signature custom attribute:

- Save the Project Area
Change the Work Item presentation
In this section we will describe how to insert the e-signature field in the Approval page
- Switch to the presentation associated to the Tasks by clicking on the edit button near to the name of the Work Item Editor.

- Select the Approvals > Approval (layout: <none>) item in the Editor Presentation tree view

- Press the Add Presentation… button
- Because we only want to change the Tasks presentation, select the radio-button titled “Replace the instances of the shared section and tab with unshared duplicates” and provide an ID for the tab and an ID for the section

- In the Add Presentation dialog

- Select the customer attribute you have created for the e-signature
- Set the kind to “E-Signature”
- Make visible the associated label
- Ask to hide the field during the creation of a Task
- As well as when the Task is in the state Approved, In Progress, Invalid or New.
Actually, the user needs to see this field only when the work item is on the Done state.

- Press OK to close the Edit presentation dialog.
- Press the Move Up button to move the E-Signature field over the Approvals list.

- Save the Project Area
Enforce the approval process with an E-Signature
It is time now to specify in the process that we want to enforce the approval using an e-signature.
- In the Process Configuration, go to the Team Configuration > Operation Behavior page
- In the Operation Behavior section, retrieve the operation Save Work Item (server) then select the cell which is in column of the desired role
- In the Precondition section, add the precondition named E-Signature

- In the Types list select Task the press the Edit button

- In the dialog select the workflow action requiring an E-Signature, in our case, the Approve action then press OK

- Save your project area.
Test the E-Signature
Let’s create a new task and set the same approval again.

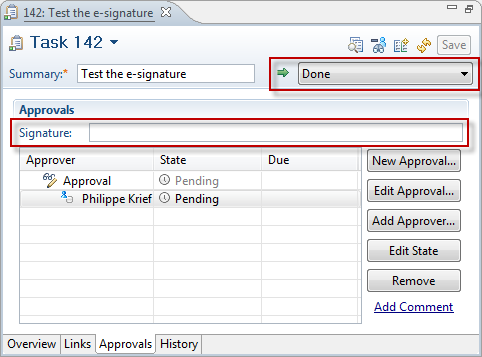
You can notice that the e-signature field is , for now, not visible in the Approvals page.
Once the Task is completed, the approver has to approve the result.
Please notice that the e-signature field is now visible because we have reached the Done state.
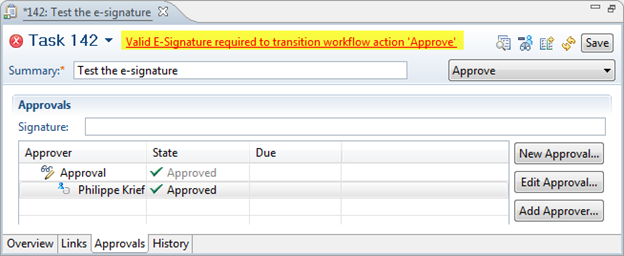
Now, if the approver forgets to sign and tries to save the work item, he will get the following error message:
To sign, the approver will have to type the password that he uses when we logs into the Jazz team Server. Once the work item is saved, the signature field will disappear, as requested during the setup of the presentation:
And the work item history will provide the information specifying who effectively sign the approval:
To conclude with the E-Signature, the only concern that we have on this E-Signature setup is that, even if there is nothing to approve, the process will require an e-signature to move from the Done state to the Approved state. A request for enhancement has been created in jazz.net to suggest an improvement by being able to not requesting an e-signature if there is no approval set up (see e-signature Enforce only for existing approvals (169362)).
I hope it will help you understand approvals in Rational Team Concert…


Nice post – very helpful.
Thanks for a clear and precise article.
Very nice article. Great job!
I totally agree with Andy.
Philippe, do you know if it is possible to configure work item so when it gets created it has an approval entry pre-created? I wonder if this could be done via some custom follow up action.
Did you try work item templates ?
Once we reject an approval that performs an action to move it to a state how do we make sure that all the approvals gets reset to “pending” when it goes for approval a second time?
Very nice post!
Hi
What if a user selects himself as an approver?? Any restriction on this?
Regards
Feroz
How to enforce a method where only if the ‘approval’ is present for the work item, then only force user to approve it before closing? It doesn’t sound logical to force approval for a workitem for which there is no approval